

TECHNOLOGY
in Production
The 3 Sides
The filmmaking process can be split up into three main sections;
Pre-Production, Production, Post-Production
Technology can also be split into;
hardware, software, and online.
Hardware is defined as the tangible pieces of equipment you can physically interact with, hardware on set for example is made of cameras, microphones, lights, etc… On our shoot day, we used a Black Magic 4k Mini URSA camera on a Vinten tripod, Sennheiser Shotgun mic, and Titan lights.
Software refers to any programs, applications, and scripts provided digitally by a computer, such as editing apps, some of the ones we used were iMovie, Adobe Premiere Pro, and Google Docs/Slides.
Finally, Online includes activities performed on various services available through a computer, mainly the internet, which we used to access online shops like Amazon or an independant store to order the necessary costume and makeup for our sequence.

Pre-Production
Our Pre-Production process consisted of a large amount of research and planning mainly utilising online technology, all except for the planning stage where we filmed our Test Shoot;
We used my personal Canon EOS 750D as the device to actually record the footage, as well as my group-mate’s iPhones to take photos of the process behind the scenes, I later used the free editing software iMovie to edit the sequence together as I was using my own laptop and could only use free services.
Using online services played a large role in obtaining all of the costume parts and makeup products we wanted for our main character as they would have been difficult to search for in person.


I was then in charge of buying all of the makeup products I needed to achieve the wound effect on the main character’s leg for a certain shot, so I had to make sure I used online services like google to inform me on the best quality brands that offered these products with the most reasonable prices, and would again arrive on time for our Shoot day. I was looking to be able to purchase all of the products I wanted on a single website to avoid varying delivery times or other complications, and with the help of google reviews, I ended up looking through a website named The Horror Shop, which conveniently sold all of the specific items I had planned to use; tubes of both clotted and runny fake blood, a latex prosthetic wound, adhesive, and sponge applicator.
All of the research we conducted as a group in order to narrow down the options we would have to seek out was done using large online services, where we looked up examples and scenes from films similar to ours; for example, I looked for extracts from the 2018 Tomb Raider film posted onto the Youtube app by various independent creators to analyse the main character’s costume design, and later used Google to access some websites providing full costume breakdowns of any other lookalike characters for me to then compile the necessary list of what we had to purchase to send to my group.
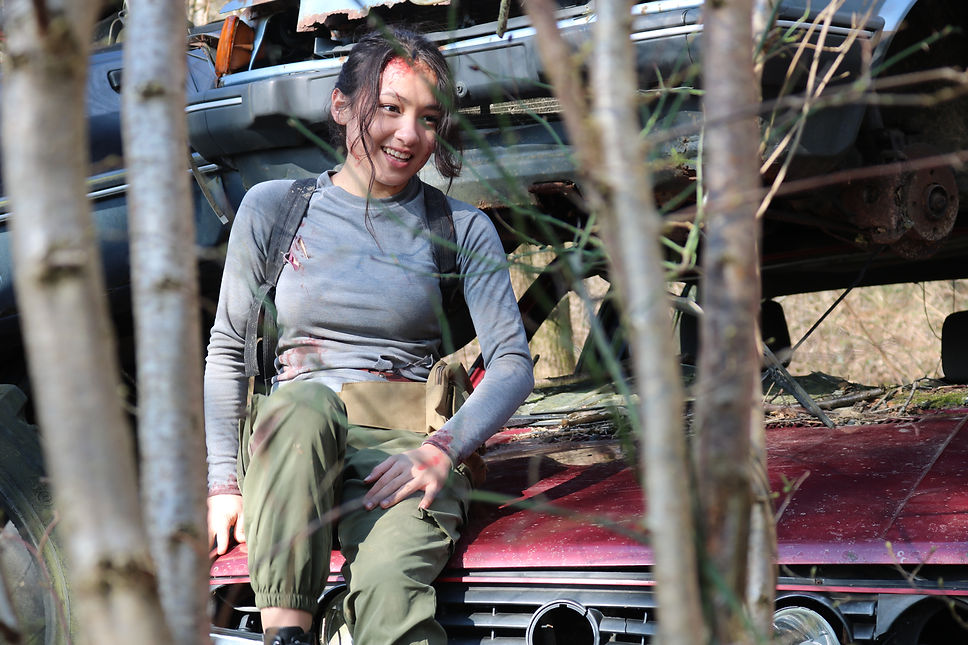
For costume, I sent a short list of every item of clothing I wanted our main character to wear over to my group-mate Joy, who we put in charge of purchasing the costume; this included specific garments like a fitted long sleeved grey shirt, dark green cargo pants, a black rucksack, and a brown waist bag, all of which she managed to find on the large multinational companies Amazon, ASOS, and Shein. I helped her search for the cheapest deals on each of these items on their respective websites as they all clearly classified any similar products to the ones we were viewing that had lower prices, as well as stating their estimated delivery time, which we had to make sure lines up with our designated Shoot day in order to make sure we would have them in time.

Production
For the Production stage of this project, we obviously made much more use of hardware technology to film, more so than the other two. However, in order to ensure we were fully prepared for Shoot day and had access to all of the information we had gathered beforehand to help us out, we compiled our shooting schedule, call sheet, shot list, and group storyboard documents all into one Google Docs document, which we then downloaded as a pdf and kept at hand on set to refer to whenever needed.
Online services also proved useful on the bus ride to the shooting location as I took the time on that somewhat long drive to look up an article on how to apply a latex prosthetic so I could refresh my memory on the process and prevent making any silly mistakes - I quickly found a clear tutorial that was broken down into simple steps on an sfx makeup website I found as a top result on Google, which I regularly referred to throughout the application process to make sure it ran smoothly and quickly.
Once we arrived to the destination for our Shoot day however, the hardware technology available to us was to be extremely useful of course as we relied on its quality to produce the best looking outcome, particularly when filming the final long take of our sequence as we had to creatively approach the equipment to ensure it co-operated with the ideas we came up with for the shot. Since we eventually decided on filming a final long take so we could build tension, we had to make sure the designated individual shooting any of the takes was treading lightly when carrying the camera (a Black Magic 4k mini URSA, but handheld this time - it was previously set up on a Viten tripod) as it proved to be a significantly heavy piece of equipment that we had to sacrifice physical effort for to maintain silent in return for its impressive quality.
The second person included in completing this shot was in charge of capturing its unique sound progression by carrying a Shotgun Sennheiser mic whilst closely following the leading camera operator in silence, listening out for any vocal queues announced by that operator. - such as ‘Door!’, calling for the set door to be opened off screen to let in more light - in order to know when to adjust the mic position specific to the model to avoid capturing the sound produced by that door and instead focus on the action occurring on screen.
Towards the midpoint of the long take, in what I consider to be my favourite shot of the sequence, the camera shows both the main character with a terrified facial expression in the foreground and the villain’s silhouette in the background which, as well as making use of the camera’s sensitive focus control on its third wheel to capture clearly, also called for the use of further hardware equipment to create the ideal lighting conditions. In addition to the already professional camera and microphone set, the media department also provided us with Titan lights that offered an extensive range of colour options. Of these, we settled on a warm-yellow toned but bright setting that adequately lit up and enhanced our main character’s expression, but still maintained a dark and mysterious tone. This was necessary for the specific shot we used it for as we insisted on capturing both the actual visible danger occurring in the background, as well as the main character’s less clear reaction to it; since it was filmed from the outside looking straight into the dimly lit car where she was hidden in, the shot ultimately called for some form of strong yet subtle lighting, which was then sourced by those bold Titan lights.
So, modern and advanced hardware technology proved to play an essential role on the Production stage of our sequence as it allowed us to take advantage of every piece of equipment’s industry standard quality in order to achieve the best outcome we could possibly put together as a group for every single shot of our final product.


Post-Production
As we moved onto the Post-Production stage of our project following a somewhat long period of time after it was filmed, we eventually had access to all of the footage we had shot that day, which we reviewed and edited together using a Mac Computer that could handle projects like this with lots of data, all on a comfortably large screen size.
Once our final product was finished, we proceeded to upload it to the online video sharing platform Youtube to make it available to the wider public.
The majority of this stage was made up of editing our footage and adding sound effects, which we carried out using the editing software Adobe Premiere Pro, used widely by filmmakers of any level of experience or budget.
The wider sequence also saw the use of a digital audio library that we used to look for very specific sound effects, we were able to filter out what effects we were looking for exactly by using its search bar to type out a short description of a sound - for example, we spent a significant amount of time looking up combinations of the phrase ‘metal hinge squeak’ to find a track we were happy with, made easy by the quick and effective software of the audio library allowing us to simply click on any track to instantly playback. Whenever we found a sound effect we were happy with, we would then drag its file out onto the timeline in Adobe Premiere Pro to match to the video, as well as often using audio editing tools to shift it in pitch/volume or cut to measure various minimal actions as the software allowed us to zoom into the files in order to make sure the cuts lined up exactly as desired.

One key moment in our sequence that took up a large part of the editing process and had to focus a lot of our knowledge on involved the middle third of the sequence, particularly the chase scene, as we had to make use of different intricacies of the service to fix specific details. Such as a minor continuity mistake we noticed where the main character picks up her bag in one shot, but is missing it in the next, which we fixed by learning how to simply crop the shot to cut the bag just out of frame. The first shot of the chase sequence also seemed to look slightly out of place as its lighting greatly contrasted its surrounding scenes, so we again used the designated setting for colour grading/correction in order to turn down the exposure and turn up the saturation and contrast.
We also had to use the internet to search for audio clips of motorcycles revving that fit the length and were recorded at the exact distance from the camera we were looking for. The group member responsible for finding this used the software Google Drive to access any videos he had saved beforehand of motorcycle recordings he found on the Instagram app to scroll through for potential audios. Once we agreed upon a good recording, we had to send the file to the Mac to then use in Adobe Premiere Pro, similarly using its available audio editing tools to add reverb to and automate the track’s volume to fit with the scene.